

How to chink a log home; best chinking techniques and materials guide.
Whether you have a log home or are thinking about building one, chinking is a term that you should get familiar with. In this article we are going to answer all of your questions about chinking. The first question that comes to most people is, what is chinking?
Chinking is a synthetic sealant that is used to seal the joints of log homes. Chinking is textured like mortar and very flexible. Chinking can be used in place of caulk and is mostly used in the joints between logs. Chinking keeps moisture out by sealing the joints and protects log homes from moisture related damage.
Chinking is important in keeping moisture, insects, wind, and other forces of nature from entering logs. So, what is chinking made of? Chinking used to be made using a mixture of clay, lime, silt, sand, ash, and dirt. This mixture used to vary depending on what was available in the region. Old mixtures were not made of elastic and would pull away from the logs. Chinking today is made of an acrylic elastic compound with special components that allow it to adhere to the logs and flex with the log movement. This new synthetic chinking is often called Elastomeric chinking and does not chip like cement mortar. Today there are three different types of chinking synthetic (most popular), cement chinking, and traditional or homemade chinking.
How long does chinking last and how much does it cost?
If you are purchasing a log home or thinking about building one, you might wonder how long does chinking last and how much will it cost? Chinking like everything else lasts longer if you maintain it. Chinking on average lasts around 20 years if it was applied correctly using a backing rod. Chinking can last up to 40 years if maintained annually and not exposed to extreme weather conditions. The cost of chinking a log cabin yourself is between $3 and $6 per linear foot. This price can vary depending on many factors such as gap size, choice of material, height of gable wall to the ridge, and more. Chinking from start to finish on the average sized cabin cost between $3,000 and $7,000; this is normally a one time cost and yearly maintenance costs on average around $200.
Getting started - Materials for chinking a log cabin.
The first step is to gather your tools and materials. In this tutorial we are going to use the bulk loading gun and foam brush method. You can learn about all 5 chinking methods here. These are the materials that you will need to chink your log cabin:
- Backer Rod
- Chinking or Caulking
- Caulking Gun and Nozzle
- Spatula or Putty Knife
- Misting Bottle
- Foam Brushes - Slightly smaller than your chinking width
- Empty Buckets For Storing and Cleaning Brushes
- Ladder or Scaffolding (Depending on your project)
The method that we are using allows you purchase your chinking in 5 gallon buckets (cheaper than buying it in tubes) and the bulk loading gun comes with a variety of nozzle sizes which make chinking much easier.
How to prepare your cabin for chinking.
Before you start chinking, there are some preparations that should be made. The most common question is should I stain or chink first? While, this is not a requirement there is one method that is easier. You should almost always plan to stain your cabin before you chink. There are many reasons for this. Stain does not stick to chinking and will create drip marks. It can also create discolor effects depending on your chinking. Staining first adds an extra layer of protection to your logs from bugs and rot. It is important to let the stain dry for 2 to 7 days before chinking in order to ensure that the stain is completely dry. If you try to chink before the stain is completely dry then your chinking might not adhere. It is also a good idea to check with the manufacturer or dealer to ensure the stain and chinking are compatible. When preparing your log cabin for chinking you will want to make sure that the space between the logs is clear of grass, bugs, and other debris that might cause your chinking to peel later on. You will want to use a mild cleaner and NOT a strong power washer. Attention to detail will make your chinking last longer. Logs should be anywhere between 40 F - 80 F. If the logs are to hot it will evaporate the water and if they are to cold then the chinking will not seal.
Start chinking your log home.
The next step is to prepare your tools for chinking. When chinking, water is your best friend. You will want to use water and a spatula or foam brush to go over your work. As you apply your chinking you will want to go over it in order to clean up your mistakes and smooth your chinking out to ensure that it is adhering to the logs. A tip is to have two buckets of water. One bucket will have your foam brushes and water. The second bucket will be full of clean water and is where you will place your dirty brushes. In order to get the most out of your brushes, you will want to use each side of the brush. Many people buy up to 50 brushes at a time. More brushes allow you to keep going and rinse less often. Some people choose to use spatulas instead. You can view our tool description and best practices here.
How to apply backer rod.
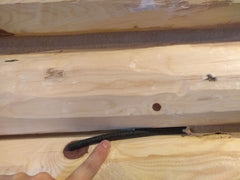
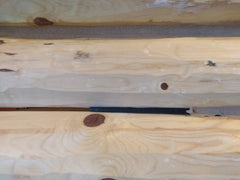
Once you are ready to go over your work, it is time to start chinking. The first step in chinking is to apply backer rod. If you have a large crew and the weather is cooperating then it might make sense to apply backer rod to the entire building. If it is just you or a small crew then you will want to only apply backer rod to a small section. Some of you might be wondering what is backer rod and what does it do? Backer rod is a necessity when chinking. Backer rod is a synthetic foam which is placed in the cavity between logs. Backer rod makes sure that the chinking only adheres to the top and bottom of the log in order ensure movement. When the chinking adheres to only 2 surfaces (top and bottom) and not 3, it allows for much more movement and prevents checks. Checks are cracks that will appear in logs and chinking. There are four types of backer rod; round, triangle, trapezoid, and open cell formulation. Most log cabins will require a few different sizes. You can view our Backer Rod Guide here.
First you will want to determine which backer rod to use. This is best done by placing various sizes of backer rod or GripStrip into your joints. The size that keeps fits snugly and allows for an even spread of about ¼ to an 1” of chinking is the right size. It is important to take your time when applying your backer rod. There are two different methods to adhering your backer rod. The first method is to use staples where needed. Using staples is less messy and allows you to bring certain parts in. It is important to be careful not to rely on the staples. If there is to much pressure and the staple comes out, it might affect your chinking. The second method is to us a spray adhesive such as 3M Super 77. Spray adhesive is a bit more tedious but also will give more flex. It is done by laying the flat surface down and carefully spraying the exposed surface. Once the adhesive settles a bit and is still stick, you can carefully insert the backer rod. DO NOT SPAY THE ADHESIVE DIRECTLY ONTO THE LOGS. This will ruin your day and prevent the chinking from adhering. When applying your backer rod, do not be afraid to cut it. Knots, shallow parts, and other objects will require you to scalped your backer rod to fit. If you have questions feel free to call us.
How to apply chinking.
Now that your logs are prepared, your tools are ready, and your backer rod is in; it is time to apply your chink. Make sure that you have read our measurement guide to make sure that you have the right nozzle size and thickness. Start by lubricating your tools with a silicone type spray. Then put nozzle end of the gun into the bucket of chinking and pull the activator rod. This will suck the chinking into your gun. When applying your chinking you will want to check with the manufacturer for the recommended thickness. On average you want your thickness to be between 3/16” and 1/4" if it is to thick it will flake and if it is to thin it will break. Once you apply your chinking, you will want to use a foam brush or spatula to go over your chinking with smooth strokes in one direction. It is important to use plenty of water or a release agent. If you use a release agent, then be careful not to use too much as it will affect your chinking. Make sure that the chinking is adhering to the top and bottom really well. It is also very important to clean up spills and runs instantly. If it cures to the log, it can be extremely difficult to clean up.
While chinking your log home feel free to call and ask. Also share your experience in the comments below!